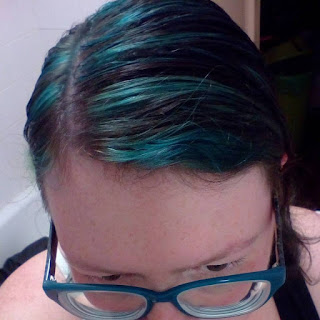
So she suggested she put some highlights in my hair and then dye the highlights with a semi permanent to turquoise
The result was pretty good I think

But it wasn't quite what I wanted so I left it for a few weeks to let my hair heal from the bleach for the streaks and then I ordered a home hair lightening kit from Smart Beauty on amazon. I also ordered a few different semi-permanent dye's including a really nice Arctic Fox Purple Rain and a directions hot pink and lilac :)
As it was my first time in a looonnnnggggg time bleaching my hair I followed the instructions to the tee
- cut a small 3cm bit of hair from under at the back of my hair and tied it with cotton
- made up a tiny amount of the bleach and sealed up the packages with sellotape
- did a patch text with the made up bleach - on the inside of my elbow and covered with a plaster
- painted my tester patch of hair with the bleach and checked in on it every 10 mins to see the setting time
- washed and dried my tester patch of hair and then did a strength test
and finally
- did a practice dye of the hair with some of the pink dye to make sure it would take
After all this I found out that the ideal 'baking' time for my hair wit the bleach was for 35 minutes and that my hair was lovely and strong after it :)
48 hours after the patch test I was good to go
The kit comes with gloves and an applicator brush but you need your own mixing pot - a thoroughly cleaned plastic takeaway pot works fine - you also need some clingfilm to cover your hair with whilst it's baking and an old towel or hairdresser cape to protect your clothing from it.
I started by separating my hair into 4 sections - and then started to apply the bleach kit starting on the back sides (middle of hair and the the ends and finally the roots on each section before moving on to the next) then the front bits. You have to do this fairly quickly as, as soon as that bleach hits your hair it starts to work!
I managed to get most of my hair covered reasonably evenly although it's a bit hard when your hair is longer than chin length and you cant see the back of your own head! The instructions call for a reliable friend but as I didnt have one to hand I just went for it and hoped for the best!
I covered my hair in clingfilm and waited for the bleach to work.
Interestingly I learned something new and a rather valuable lesson - if you have turquoise streaks in your hair and you apply bleach all over then those streaks will turn a kind of neon green and they will sear across your hair!!!
I found this out when it came to wash the bleach off and my hair was bleached a shocking white blonde with neon green hues throughout! Ooops!!!
Luckily my hair didn't seem at all damaged by the process and after a shampoo and a good condition (Aussie Miracle Repair). I was able to dry it off and apply the dye - originally I was going to go for half pink and half purple but I didnt think the pink would take on top of the green so I decided to go for all over purple.
After reading the reviews on the different dyes I bought I decided to use the Arctic Fox as it was a darker colour and had the most longevity.
This dye smelled absolutely amazing - it's an american company and they scented it to smell like grape :D Lovely
I applied it all over - I didnt bother using the tinting brush I literally just put on some gloves applied and rubbed in all over -left it on for about 2 hours and voila!
The pictures dont really do justice to how amazingly bright this purple is (we have crap energy saving light bulbs and unfortunately its dark and gloomy outside all day thanks to the torrential downpour - gotta love the Welsh weather)
I really like the colour it has put on my hair its bright and fab - interestingly there was little to no leakage onto my pillow last night - normally you get a lot of spotting from this.
The only issue I had with this dye is that it's really hard to remove from your skin after - I have blueberry coloured ears and patches on my arms and hands where I couldnt get it off straight away but after 2 showers it's started to fade from my skin (although not my hair yay) The dye does not come with anything other than the dye - you need your own gloves, tint brush and mixer bowl.
Overall the cost of doing this at home was just under £15 - £5 for bleach kit and £10 for dye. I already had a hairdressers cape, tint brush and pot for the dye as well as plastic gloves.
I think over-all the home kit worked out well because I have had plenty of experience of doing my own hair and wasn't nervous (I had a plain brown dye on hand in case it went really wrong!) but the bleach kit was super easy to use and the instructions clear and easy to follow so I think an absolute beginner could use it without too much difficulty.
I am quite pleased to have gone back to bright colours on my hair and also that the bleach doesnt seem to have caused much in the way of damage


No comments:
Post a Comment